Comments on Commenting

This is just an administrative post, which you’ll need to read only if you plan to leave a comment on one of my posts. This is my policy on commenting, and a note about the images that appear on this blog.

gadget

Comments are welcomed and encouraged on this site, but all comments will be viewed and approved by the moderator before becoming visible.

There are also instances where comments will be edited or deleted as follows:

  • Comments deemed to be spam or possible spam will be deleted. Including a link to relevant content is permitted, but all comments should be clearly relevant to the post topic.
  • Comments including profanity will be deleted.
  • Comments containing language or concepts that could be deemed offensive will be deleted.
  • Comments that attack a person individually, or the display of which may expose me to potential liability for defamatory conduct of any kind, will be deleted.
  • This is a non-commercial blog, carrying no advertising, the goal of which is to disseminate information. Comments that promote specific goods or services are not permitted and will be deleted.
  • Given the declared subject matter of this blog, comments of a political or religious nature are unlikely to be relevant. Such comments will be deleted, unless they seem to be rational and highly relevant to the topic.
  • I have no interest in posting content written or supplied by others, whether paid or not, nor in entering into any collaborative effort in connection with the blog content. You can link to my posts, but you cannot re-post my content elsewhere. Please don’t bother to post comments or send emails asking about such arrangements.

The owner of this blog reserves the right to edit or delete any comments submitted to this blog without notice. This comment policy is subject to change at anytime.

Images: all images shown on my blog are copyright (whether or not they contain an explicit copyright statement), and may not be reproduced anywhere else, in any form, without my written permission in advance.

Oh, and one final thought. If you send me a vague comment claiming that I need to check spelling in my posts, then I’ll know you haven’t read them!

Analyzing CSS Styles in a Large Set of XML Documents

This post explains how I created a small program for the automated processing of text, so there won’t be anything about graphics or spelling here! I’ve created many such programs, large and small, over the years, so this is just intended as a sample of what’s possible. This program analyzes CSS styles applied to a large set of XML-based documents.

In my work, I frequently need to be able to analyze and modify large sets of XML-encoded documents (typically 10,000+ documents in a single project). It’s simply not practical to do this by opening and editing each document individually; the only realistic way is to write a script or program to perform the analysis and editing automatically.

Recently, I needed to update a Cascading Style Sheet (CSS file) that was linked to a large number of XHTML topic documents in a publishing project. The CSS file had been edited by several people over many years, with little overall strategy except to “keep it going”, so I was aware that it probably contained many “junk” style definitions. I wanted to be able to delete all the junk definitions from the CSS file, but how could I determine which styles were needed and which were not? I needed a way to scan through all 10,000+ files to find out exactly which CSS classes were used at least once in the set.

Years ago, I gained a great deal of experience of programming in C++, using Microsoft’s MFC framework. About 8 years ago, for compatibility with other work that was being done by colleagues, I began to transition to programming in C# using Microsoft’s .NET architecture. Thus, I decided to use C#/.NET to create a program that would allow me to scan huge numbers of XHTML files rapidly and create a list of the CSS styles actually found in the topic files.

Until the advent of .NET 3.5, I’d become accustomed to working with the class XmlDocument. While this was a definite improvement over previous “XML” handling classes, it could still be awkward for certain operations, such as, for example, constructing and inserting new XML snippets in an existing document. I was delighted, then, to discover the new XDocument class that was introduced with .NET 3.5, and I now use the newer class almost exclusively. (For some discussion of the differences, see http://stackoverflow.com/questions/1542073/xdocument-or-xmldocument)

Analyzing CSS Styles: Code Sample

Here are the critical methods of the class that I created to walk the XML tree in each document. The first method below, walkXMLTree(), executes the tree walking operation. To do that, it obtains the root element of the XML tree, then calls the second method, checkChildElemsRecursive(), which actually traverses the tree in each document.

using System.IO;
using System.Xml.Linq;

public int walkXMLTree(string strRootFolderpath, ref SortedList<string, string> setClasses)
{
    string[] strFilepaths = Directory.GetFiles(strRootFolderpath, "*.htm", SearchOption.AllDirectories);

    List<string> listDocsFailedToLoad = new List<string>();

    int iElemsChecked = 0;

    foreach (string strFilepath in strFilepaths)
    {
        try
        {
            _xdoc = XDocument.Load(strFilepath);
            _xelemDocRoot = _xdoc.Root;
            iElemsChecked += checkChildElemsRecursive(_xelemDocRoot, ref setClasses, strFilepath);
        }
        catch
        {
            listDocsFailedToLoad.Add(strFilepath);
        }
   }

   return iElemsChecked;
}

private int checkChildElemsRecursive(XElement xelemParent, ref SortedList<string, string> setClasses, string strFilename)
{
    int iElemsChecked = 0;
    string strClass;
    XAttribute xattClass;

    IEnumerable<XElement> de = xelemParent.Elements();

    foreach (XElement el in de)
    {
        // Find class attribute if any
        xattClass = el.Attribute("class");
        if (xattClass != null)
        {
            strClass = el.Name + "." + xattClass.Value;
            if (!setClasses.ContainsKey(strClass))
                setClasses.Add(strClass, strFilename);
        }
        iElemsChecked++;

        iElemsChecked += checkChildElemsRecursive(el, ref setClasses, strFilename);
    } 

    return iElemsChecked;
}

[Code correction 6/20/16: I changed xelemParent.Descendants() to xelemParent.Elements(). By using Descendants, I was doing the work twice, because Descendants returns child elements at all sub-levels, instead of just the first level. The code works correctly either way, but if you use Descendants, the recursion is unnecessary.]

The use of the System.IO and System.Xml.Linq libraries is declared at the top of the code.

The basic method is walkXMLTree(), which generates a sorted list setClasses of CSS classes used in every one of the XHTML files under the root folder strRootFolderpath. In this implementation, the returned list contains the CSS class name in the first element of each item (for example, “span.link”), and, in the second element, the file path of the first topic file that was found to contain that class.

The method walkXMLTree() contains a loop that examines every strFilepath in the array strFilepaths. Although every topic file under strRootFolderpath is expected to contain valid XML, it’s always possible that a file contains invalid XML markup. In that case, the XDocument.Load() method throws an exception, which stops program execution. To avoid crashing the program in such a case, I wrapped XDocument.Load() in a try-catch loop. If the method fails for a particular file, the code adds the path and name of that file to listDocsFailedToLoad, then moves on to the next file. When all the files have been scanned, I can then examine listDocsFailedToLoad to see how many files couldn’t be opened (hopefully not a large number, and usually it isn’t).

For each XHTML topic that it succeeds in opening, walkXMLTree() calls the method checkChildElemsRecursive() to traverse the element tree in that document. Note that the checkChildElemsRecursive() method is indeed recursive, since it calls itself in its own foreach loop. When checkChildElemsRecursive() is initially called from walkXMLTree(), the xelemParent parameter that is passed in is the root element of the XML tree in the document being scanned.

When control finally returns from checkChildElemsRecursive() to walkXMLTree(), the variable iElemsChecked contains the complete number of XML elements that were examined. This is likely to be a huge number; in one recent test, more than 8 million elements were processed.

The final content of setClasses will be a list of every class that’s used in at least one of the topic files. In the example above, I also set each item to show the filepath of the first file that was found that included that class, because I wasn’t expecting too many surprises! To obtain a complete analysis, you could, of course, make the second item in the SortedList a sublist that would include the file path of every topic using that class.

The Two Types of Computer Graphics: Bitmaps and Vector Drawings

I received some feedback from my previous posts on computer graphics asking for a basic explanation of the differences between the two main ways of representing images in digital computer files, which are:

  • Bitmap “paintings”
  • Vector “drawings”

Most people probably view images on their computers (or phones, tablets or any other digital device with a pictorial interface) without giving any thought to how the image is stored and displayed in the computer. That’s fine if you’re just a user of images, but for those of us who want to create or manipulate computer graphic images, it’s important to understand the internal format of the files.

Bitmap Images

If you’ve ever taken or downloaded a digital photo, you’re already familiar with bitmap images, even if you weren’t aware that that’s what digital photos are.

A bitmap represents an image by treating the image area as a rectangle, and dividing up the rectangle into a two-dimensional array of tiny pixels. For example, an image produced by a high-resolution phone camera may have dimensions of 4128 pixels horizontally and 3096 pixels vertically, requiring 4128×3096 = 12,780,288 pixels for the entire image. (Bitmap images usually involve large numbers of pixels, but computers are really good at handling large numbers of items!) Each pixel specifies a single color value for the image at that point. The resulting image is displayed simply by copying (“blitting”) the array of pixels to the screen, with each pixel showing its defined color.

Some of the smallest bitmap images you’ll see are the icons used for programs and other items in computer user interfaces. The size of these bitmaps can be as small as 16×16 pixels, which provides very little detail, but is sufficient for images that will always be viewed in tiny sizes. Here’s one that I created for a user interface some time ago:

icon16x16_versions2

Enlarging this image enables you to see each individual pixel:

icon16x16_versions_enlarged

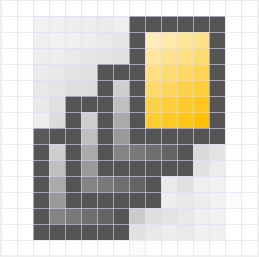
You can see the pixel boundaries here, and count them to confirm that (including the white pixels at the edges) the image is indeed 16×16 pixels.

Obviously, the enlarged image looks unacceptably crude, but, since the image would normally never be viewed at this level of magnification, it’s good enough for use as an icon. In most cases, such as digital photographs, there are so many pixels in the bitmap that your eye can’t distinguish them at normal viewing sizes, so you see the image as a continuous set of tones.

Bitmap images have a “resolution”, which limits the size to which you can magnify the image without visible degradation. Images with higher numbers of pixels have higher resolution.

Given that bitmap image files are usually large, it’s helpful to be able to be able to compress the pixel map in some way, and there are many well-known methods for doing this. The tradeoff is that, the more compression you apply, the worse the image tends to look. One of the best-known is JPEG (a standard created by the Joint Photographic Experts’ Group), which is intended to allow you to apply variable amounts of compression to digital photographs. However, it’s important to realize that bitmap image files are not necessarily compressed.

Programs that are designed to process bitmap images are referred to as “paint” programs. Well-known examples are: Adobe Photoshop and Corel PhotoPaint.

Vector Images

The alternative way of producing a computer image is to create a list of instructions describing how to draw the image, then store that list as the image file. When the file is opened, the computer interprets each instruction and redraws the complete image, usually as a bitmap for display purposes. This process is called rasterization.

This may seem to be an unnecessarily complex way to create a computer image. Wouldn’t it just be simpler to stick to bitmap images for everything? Well, it probably wouldn’t be a good idea to try to store a photo of your dog as a vector image, but it turns out that there are some cases where vector images are preferable to bitmap images. Part of the skill set of a digital artist is knowing which cases are best suited to vector images, and which to bitmaps.

There are many vector drawing standards, and many of those are proprietary (e.g., AI, CDR). One open vector drawing standard that’s becoming increasingly popular is SVG (Scalable Vector Graphics). You can view the contents of an SVG file by opening it with a text editor program (such as Notepad).

Here’s a very simple example of an SVG image file, consisting of a white cross on a red circle:

icon_err_gen

(Not all browsers can interpret SVG files, so I rendered the image above as a bitmap to ensure that you can see it!)

If you open the SVG file with a text editor, you can see the instructions that create the image shown above. In this case, the important instructions look like this:

<g id=”Layer_x0020_1″>

<circle class=”fil0″ cx=”2448″ cy=”6098″ r=”83″/>

<path class=”fil1″ d=”M2398 6053l5 -5c4,-4 13,-1 20,5l26 26 26 -26c7,-7 16,-9 20,-5l5 5c4,4 1,13 -5,20l-26 26 26 26c7,7 9,16 5,20l-5 5c-4,4 -13,1 -20,-5l-26 -26 -26 26c-7,7 -16,9 -20,5l-5 -5c-4,-4 -1,-13 5,-20l26 -26 -26 -26c-7,-7 -9,-16 -5,-20z”/>

</g>

As you’d expect, the instructions tell the computer to draw a “circle”, and then create the cross item by following the coordinates specified for the “path” item.

Of course, if you were to try to represent a photograph of your dog as a vector image, the resulting file would contain a huge number of instructions. That’s why bitmap images are usually preferable for digital photographs and other very complex scenes.

A major advantage of vector image formats is that the picture can be rendered at any size without degradation. Bitmap images have inherent resolutions, which vector images do not have.

Programs that are designed to process vector images are referred to as “drawing” programs. Well-known examples are: Adobe Illustrator and Corel Draw.

Converting Between Bitmap and Vector Images

It’s often necessary to convert a vector image into a bitmap image, and, less frequently, to convert a bitmap image into a vector image.

Conversion of vector images to bitmaps occurs all the time, every time you want to view the content of a vector image. When you open a vector image, the computer reads the instructions in the file, and draws the shapes into a temporary bitmap that it displays for you.

Converting bitmaps to vector images requires special software. The process is usually called “Tracing”. Years ago, you had to buy tracing software separately, but now most vector drawing software includes built-in tracing capabilities. As the name suggests, tracing software works by “drawing around” the edges of the bitmap, so that it creates shapes and lines representing the image. The result of the operation is that the software generates a set of mathematical curves that define the vector image.

Summary of the Pros and Cons

There are situations where bitmap images are preferable to vector images, and vice versa. Here’s a summary of the pros and cons of each type.

Bitmap

Advantages:

  • Complex scenes can be depicted as easily as simple scenes.
  • Significant compression is usually possible, at the expense of loss of quality.
  • Rendering is computationally easy; requires minimal computing power.

Disadvantages:

  • Size: Files tend to be large.
  • Not scalable: attempting to magnify an image causes degradation.

Vector

Advantages:

  • Compact: Files tend to be small.
  • Scalable: images can be displayed at any resolution without degradation.

Disadvantages:

  • Complex scenes are difficult to encode, which tends to create very large files.
  • Rendering is computationally intensive; requires significant computing power.